Preliminaries
- Fill out the Google form.
- After validation, you will receive an email containing the port number and password for your Jupyter notebook.
- Note: Validation is done manually. Please do not fill-out the form twice.
- Note: EEEI HPC uses Conda virtual environment. As such, SUDO password is NOT needed.
- Note: Validation is done manually. Please do not fill-out the form twice.
- Open your Web browser and go to:
https://hpc.eee.upd.edu.ph:<port-number>
(e.g.: https://hpc.eee.upd.edu.ph:9999)
Note: If you received the “This site can’t be reached” error message, make sure you are using https and not http.
Note: If the page is still not loading, try https://202.92.132.110:<port-number> - Login using the password provided.
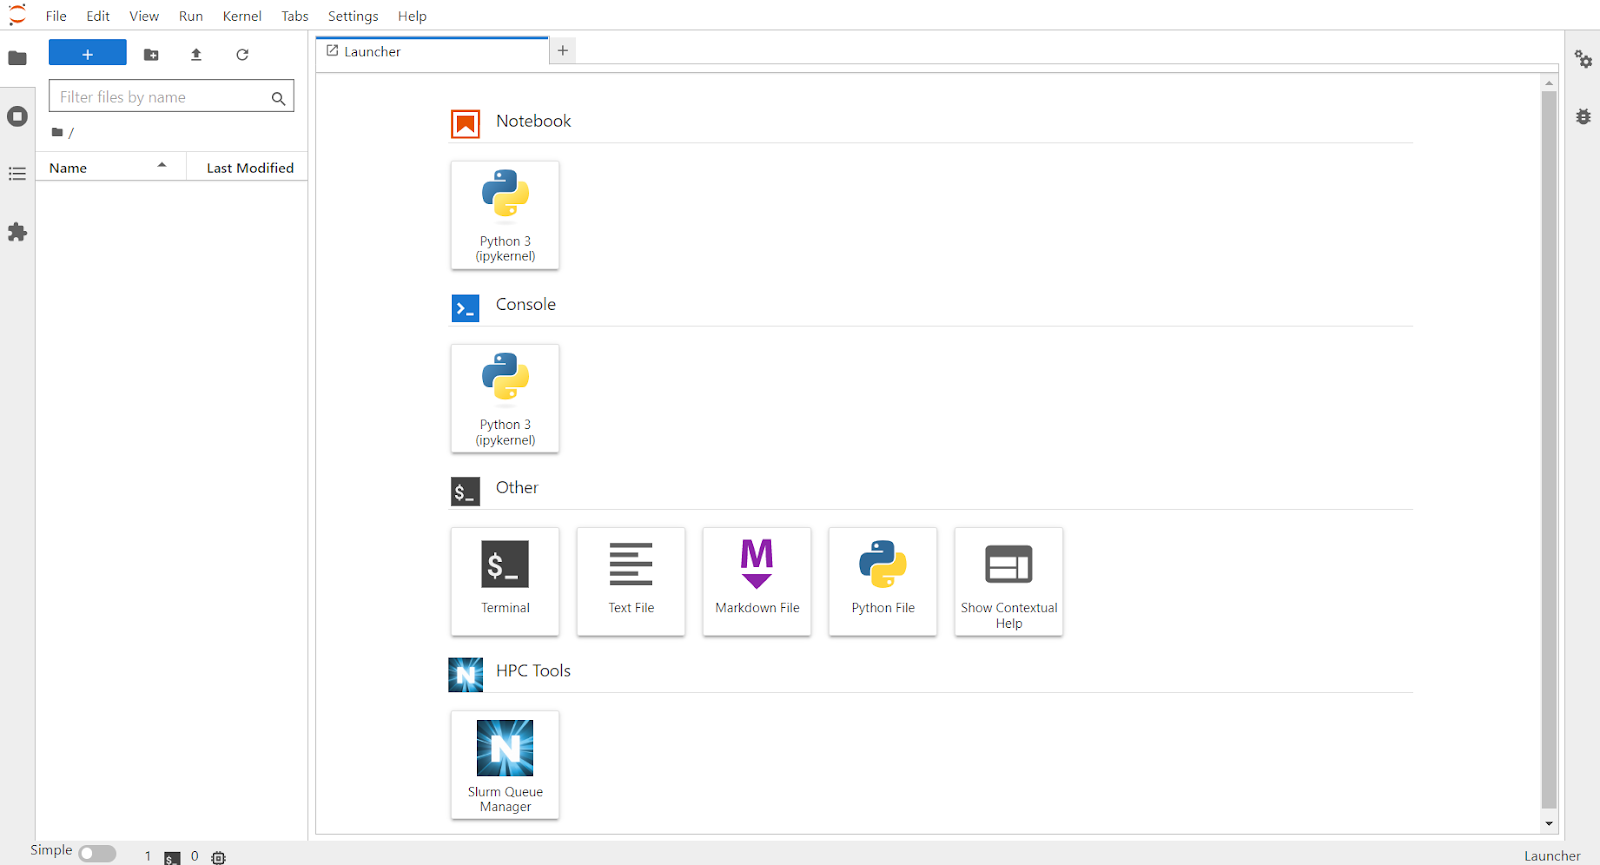
- On the Launcher page, you can see the different utility tools like Terminal, Slurm Queue Manager and Jupyter Notebooks
Note: You can go to the Launcher page again by navigating to File > New Launcher or by using the corresponding keyboard shortcut.

Creating and using environments using Conda
Creating and using a virtual environment is useful if you are working on projects that require specific version of packages and their dependencies, for example, different environments for different versions of python, pytorch, CUDA, etc.
Conda (other tools are virtualenv and pipenv) is a tool to create these isolated environments. Instead of loading a lot of different modules with different versions, you can create and activate an environment where all of a package’s specific required dependencies are stored.
Creating a virtual environment is a MUST for running tasks that require GPU resources. (later)
Preliminaries
- From the Launcher page, select Terminal to open a command line text interface.
- Check if conda is running using the command:
conda info

Create an environment using Conda
- On the Terminal, type
conda create --prefix ~/<Environment-Name>
where Environment-Name is the name of the virtual environment. Example:
conda create --prefix ~/cuda-test
Press [y] to proceed.
Another example:
To create a conda environment with Python 3.9conda create --prefix ~/cuda-test python=3.9
- List all the available environment using
conda info --envs
- Activate the newly created environment using the command,
conda activate /home/<Username>/<Environment-Name>. where Username is the name of the current user before ‘@’. Notice the changes in bash/terminal environment.Example:

marlo is the username.
Example:
To activate cuda-test for username marlo
conda activate /home/marlo/cuda-test
- To deactivate the currently active environment:
conda deactivate
- To remove an environment. Note: This will also remove all the installed packages and their dependencies.
conda remove --prefix /home/marlo/cuda-test --all
Installing packages inside an environment
- Activate the environment you want to use.
- For this tutorial, We will install Pytorch and CUDA toolkit 11.3 on cuda-test (your packages might vary. Search online for the conda installation of your packages, you may also refer https://repo.anaconda.com/pkgs/), using
conda install pytorch==1.7.1 torchvision==0.8.2 torchaudio==0.7.2 cudatoolkit=10.1 -c pytorch
- Wait for the installation to finish. If you encounter the following error: conda.gateway.disk.delete:unlink_or_rename_to_trash(140): Could not remove or rename /opt/miniconda3/pkgs/ca-certificate-XXXXXXXXXXX
Try disabling SSL verification using:conda config --set ssl_verify false
- You can see all the installed packages inside an active environment using
conda list
- Validate PyTorch version
On terminal with an active environment, type: python
>>> import torch
>>> print(torch.__version__)
1.12.1
>>> exit()
[optional] Use environment as Jupyter notebook kernel
As of Mar 23, 2023, there is a bug that prevents installed packages from appearing in a Jupyter notebook kernel. For now, please skip this part of the guide If you want to use a jupyter notebook for developing your project, follow these steps to integrate your environment as a kernel for the Jupyter notebook.
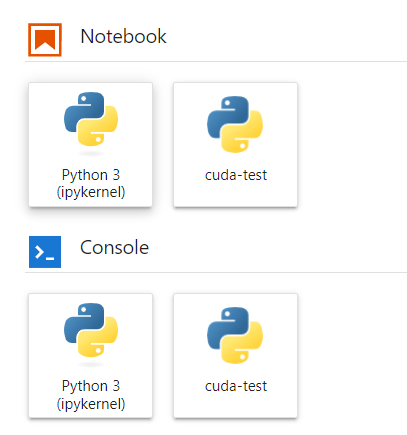
Activate the environment you want to use.Install ipykernel on your environment:conda install ipykernelAdd the virtual environment to Jupyter:python -m ipykernel install --user --name='environment_name'Refresh your Web browser. Go to Launcher, you should see the new Jupyter Notebook.Validate PyTorch version. On your environment integrated Jupyter notebook: cuda-test
Type the following:import torch
print(torch.__version__)IMPORTANT! Commands running on Jupyter notebook will NOT use GPU/CPU resources from the compute nodes. You have to convert this notebook into python script and submit it SLURM. If you wish to submit this notebook to SLURM (later). You can convert a notebook to python using the command on Terminaljupyter nbconvert Untitled1.ipynb --to python

Running non-GPU tasks
By default, the provided Jupyter lab can perform non-GPU tasks (good for single-core jobs or for debugging your code). As a standalone, you can perform project tasks such as pre-processing, development and post-processing without submitting any jobs to SLURM. However, if you need additional CPUs for multicore tasks, you can submit a SLURM job request for additional CPU resources. (see #SBATCH –cpus-per-task=1 below)
Submitting and running GPU tasks via SLURM
For tasks that need GPU for acceleration like training and inference, a job has to be submitted to the shared GPU cluster via SLURM. Note that the jobs were processed based on a First Come, First Serve basis. As a shared resource, please expect waiting/queue times.
In this tutorial, we will submit a job to one of the GPU servers on the cluster. GPU server will be chosen randomly based on availability. If you require a static GPU server, kindly email HPC support.
Due to the shared nature of cluster, you can only use 1 GPU resource per submitted job (#SBATCH –gres=gpu:1) on the samsung partition (#SBATCH –partition=samsung). If you need to use more than 1 GPU resources/use other partition kindly email HPC support.
- From Launcher, select Text File then rename file as: test.py
On test.py enter:import torch
print(torch.__version__) - Create and activate a virtual environment (see above). Create a new file and rename it to: job.slurm
On job.slurm enter:
#!/bin/bash
#SBATCH --output=notMNIST.out
#SBATCH --gres=gpu:1
#SBATCH --cpus-per-task=4
#SBATCH --partition=samsung

#Activate your environment, source command is required
source /opt/miniconda3/etc/profile.d/conda.sh
conda activate /home/marlo/cuda-test

# Insert your code here.
srun python test.py

# [Optional] You can run other commands here
srun nvidia-smi
srun sleep 10
# Sample training code format
# srun bash -c 'CUDA_VISIBLE_DEVICES=0 python train.py --workers 1 --train_data data_lmdb_release/training --valid_data data_lmdb_release/validation --select_data MJ-ST --batch_ratio 0.5-0.5 --Transformation None --FeatureExtraction RCNN --SequenceModeling None --Prediction Attn'
With this job.slurm, you will be submitting a job in partition samsung, for 1 GPU, 4 CPUs and the output file will be notMNIST.out. You can see available partition by entering on the Terminal: sinfo. To see how many available CPUs in your partition, run: scontrol show partition <partition-name>.
Note: You can utilize up to 4 CPUs for samsung partition
Note: You may not have permission to use other partition aside from samsung or partition assigned to you.
Note: It is important to activate your environment first before running your code.
- There are two ways to submit your job to SLURM:
- Using Terminal, type:
sbatch job.slurm
If your job was submitted successfully, your should see Submitted batch job plus a job id
If you see sbatch: error: QOSMaxSubmitJobPerUserLimit, it means you have reached the limit for the maximum submit job per user. Delete currently running/submitted job first before submitting a new one. (scancel JobID)
If you see sbatch: error: Batch job submission failed: Invalid account or account/partition combination specified. You might be using the wrong partition. Kindly change the partition value in your job.slurm.
If you see sbatch: error: Batch job submission failed: Requested node configuration is not available. You might be using more CPUs than the allowed allocation. Kindly change the CPU count in your job.slurm.
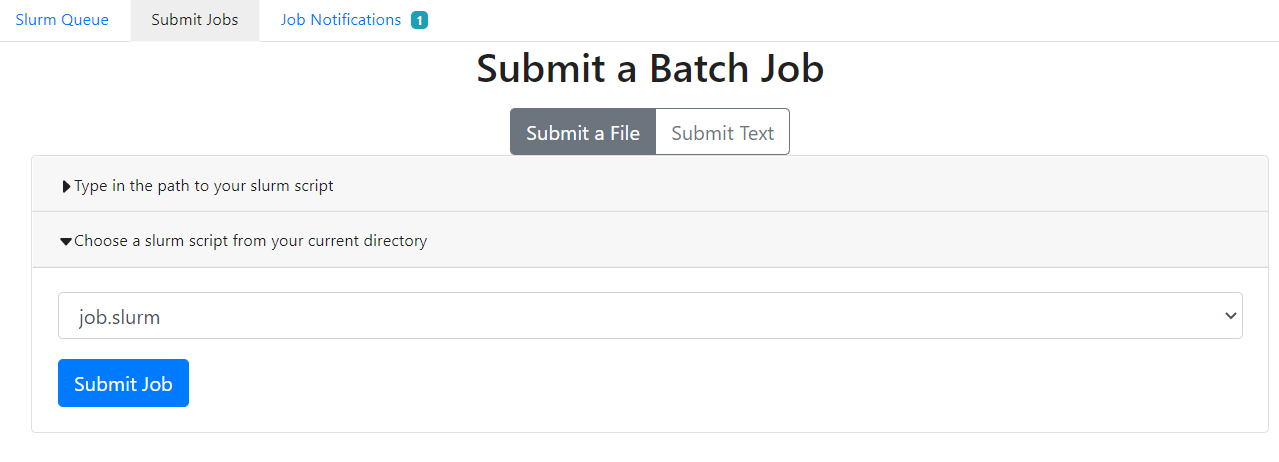
- Using the SLURM Queue Manager Utility
On the Launcher, navigate to Submit Jobs and choose job.slurm from your current directory. Errors and notifications can be viewed on Job Notifications while currently running jobs can be viewed on Slurm Queue.
- Using Terminal, type:
- To view the status of your running job:
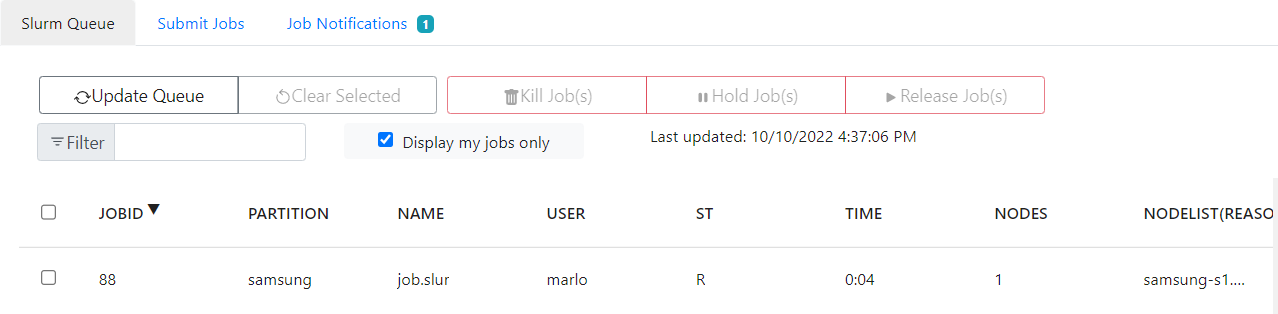
- From the Terminal, type squeue. Status R means your job is currently running, PD means it is currently waiting for available resources. Take note of your JobID.
- From the SLURM queue manager, use the Update Queue button to check the queue list.
- From the Terminal, type squeue. Status R means your job is currently running, PD means it is currently waiting for available resources. Take note of your JobID.
- To view additional job details:
scontrol show job <JobID>
- After running your job, a file named notMNIST.out should appear, containing the result of your project. To effectively view the changes inside this file, use the Terminal command: cat notMNIST.out
- To cancel currently running/submitted jobs, you can use the Kill Job(s) in Slurm queue manager or using Terminal: scancel JobID
- Note: You can only kill jobs you submitted